I am going to apologise for a couple things; firstly, the lack of posts. With all the Holiday baking, sewing, knitting, cleaning and general gift-making, I have had little time to go on the computer and write. There have been a couple posts I wanted to share, one of which was the bringing home of our tree (I just love Fraser Firs!), and the special ornaments we hang each year. Then we got a beautiful piano (for free! Pay it forward is the most amazing idea ever!), and again, I wanted to share what a blessing that has been for our family, and show off the beauty of this 101+ year old instrument it is. Alas, that brings me to my second apology, which will be the lack of photos for a while. I lent the camera out to my sister in law, so until she's finished with it there will be no photos.
But to stay on topic, the theme for this weekend's cooking (and coincidentally gift-making) was everything BBQ. We have many BBQ enthusiast in the family, and so I decided to try my hand at making several variations of BBQ sauce and meat rubs. I scoured the Internet for recipes that sounded appealing, but also quite different from one another, and finally came to these six; three sauces and three rubs. I altered the amounts slightly from the original recipes, and will include those amounts instead.
For the rubs the directions are the same: combine all dry ingredients first, then add small amounts of vegetable oil (or any other flavourless oil) at a time, stirring completely, until you have a firm paste. Transfer into hot, sterilized jars (I just run the jars through the dishwasher), and then boil the jars for about 10 minutes. Because of the oil, refrigerate after opening so the rubs do not go rancid.
Chili-Lime Steak Rub
Caution; has a some kick to it!
1/4 cup sweet or Thai basil
1/4 cup chili powder
1/4 cup garlic powder
2 tbsp cumin
2 tbsp coriander
1 tbsp cayenne pepper
1 tsp chili flakes
1 tbsp sea salt
2 tsp black pepper
3 tbsp lime juice (add this at the same time as the oil)
Jamaican Jerk Meat Rub
1/4 cup dried onion flakes
1/4 cup onion powder
8 tsp thyme
8 tsp sugar
8 tsp sea salt
4 tsp allspice
4 tsp black pepper
Kansas City Meat Rub
1 cup brown sugar
1/2 cup smoked paprika
2 tbsp black pepper
2 tbsp sea salt
2 tbsp garlic powder
1 tbsp onion powder
Chicken and Rib BBQ Sauce
This is your basic all-round BBQ sauce. It's great just as-is, but I plan on experimenting with other additions to see what flavours I can come up with!
3 cups ketchup
1/2 cup water
1/2 cup white vinegar
1/2 cup brown sugar
6 tbsp olive oil
4 tbsp chili powder
4 tbsp paprika
4 cloves of garlic
Mince the garlic and saute in olive oil until golden. Add the ketchup, water, and vinegar and still until combined. Add the remaining ingredients and let simmer for 10 minutes. Transfer to hot, sterilized jars, and boil the jars for 10 minutes. Store at room temperature, but refrigerate after opening.
Teriyaki BBQ Sauce
This sauce wasn't as "teriyaki" as I'd like, but I have to remember that it is a BBQ sauce, not a basic teriyaki sauce. Despite that, it is delicious!
4 cloves garlic
2 small onions
6 tbsp sesame oil
3 cups ketchup
1 tbsp chili sauce
12 tbsp soy sauce
12 tbsp brown sugar
Mince and saute the onion and garlic in the sesame oil until the onions are translucent. Add the ketchup, chili powder, soy sauce, and brown sugar, and mix thoroughly. Let simmer for 10 minutes. Transfer to hot, sterilized jars, and boil the jars for 10 minutes. Store at room temperature, but refrigerate after opening.
Chipotle BBQ Sauce
Caution; very hot!
2 1/2 cups ketchup
1/4 cup brown sugar
1/4 cup diced onions
2 tbsp Worcestershire sauce
2 tsp garlic powder
1 tsp chili flakes (okay, so I know this really isn't chipotle, but it does the trick!)
1/2 tsp black pepper
Combine all ingredients, including diced onions in saucepan and let simmer for 10 minutes. Transfer to hot, sterilized jars, and boil the jars for 10 minutes. Store at room temperature, but refrigerate after opening.
Sunday, December 12, 2010
Sunday, December 5, 2010
If not by MY hands; then by my Neighbour's
For me it is easy to get so caught up in the idea of a Handmade Holiday, that it's easy to forget that that doesn't necessarily only handmade by me.
Even for one who professes to be as crafty as I, it would be hubris to assume I could do it all alone. Whether due to lack of time, or resources, or skills; at some point I have to look to others for help.
Yet I am lucky enough to live in a community that though small in population, has a wealth of talented artisans and craftsmen.
Our local nexus for the artisan and fair-trade community is the shop The Karma Marketplace. Not only is it an outlet for crafters and artists to sell their wares, but they also sell local organic meat and produce, preserves, and soaps.
Yesterday I went searching for something for some of the women on our list, and found these:

I wish I could convey to the Internet how amazing the soaps smell, and I just know the jewellery will look stunning on the recipients!
Both jewellery and soap making are two more crafts I would like to try my hand at in the future, but for now I am happy to be able to support my neighbours who are creating them!
Tuesday, November 30, 2010
Preparing for the Holidays Part 4: Wreath Making Bee
Next year, when I am presumably more organized (do I not say that every year!?!), I want to hold more workshops, tutorials, and other simple gatherings for the women (and men!) in our family and neighbourhood to come together with the purpose of creating handmade and crafty Holiday gifts. I've been inspired by some of the craft ideas I've seen on other blogs, and now I am just itching to try them out myself!
But that is not to say I havn't been able to organize anything yet this year. In fact, last night we (the women of my husband's family) held what I hope will be our first annual wreath making bee. It was a wonderfully successful time, filled with delicious food, aromatic hot mulled cider, and of course, the scent of a mountain of evergreen:

We had everything set up in our kitchen, and listening to the sound of children's laughter in the next room, began our work:

I am always amazed how that even with the same supplies available and the same techniques used, we were all able to create unique and beautiful works of art:

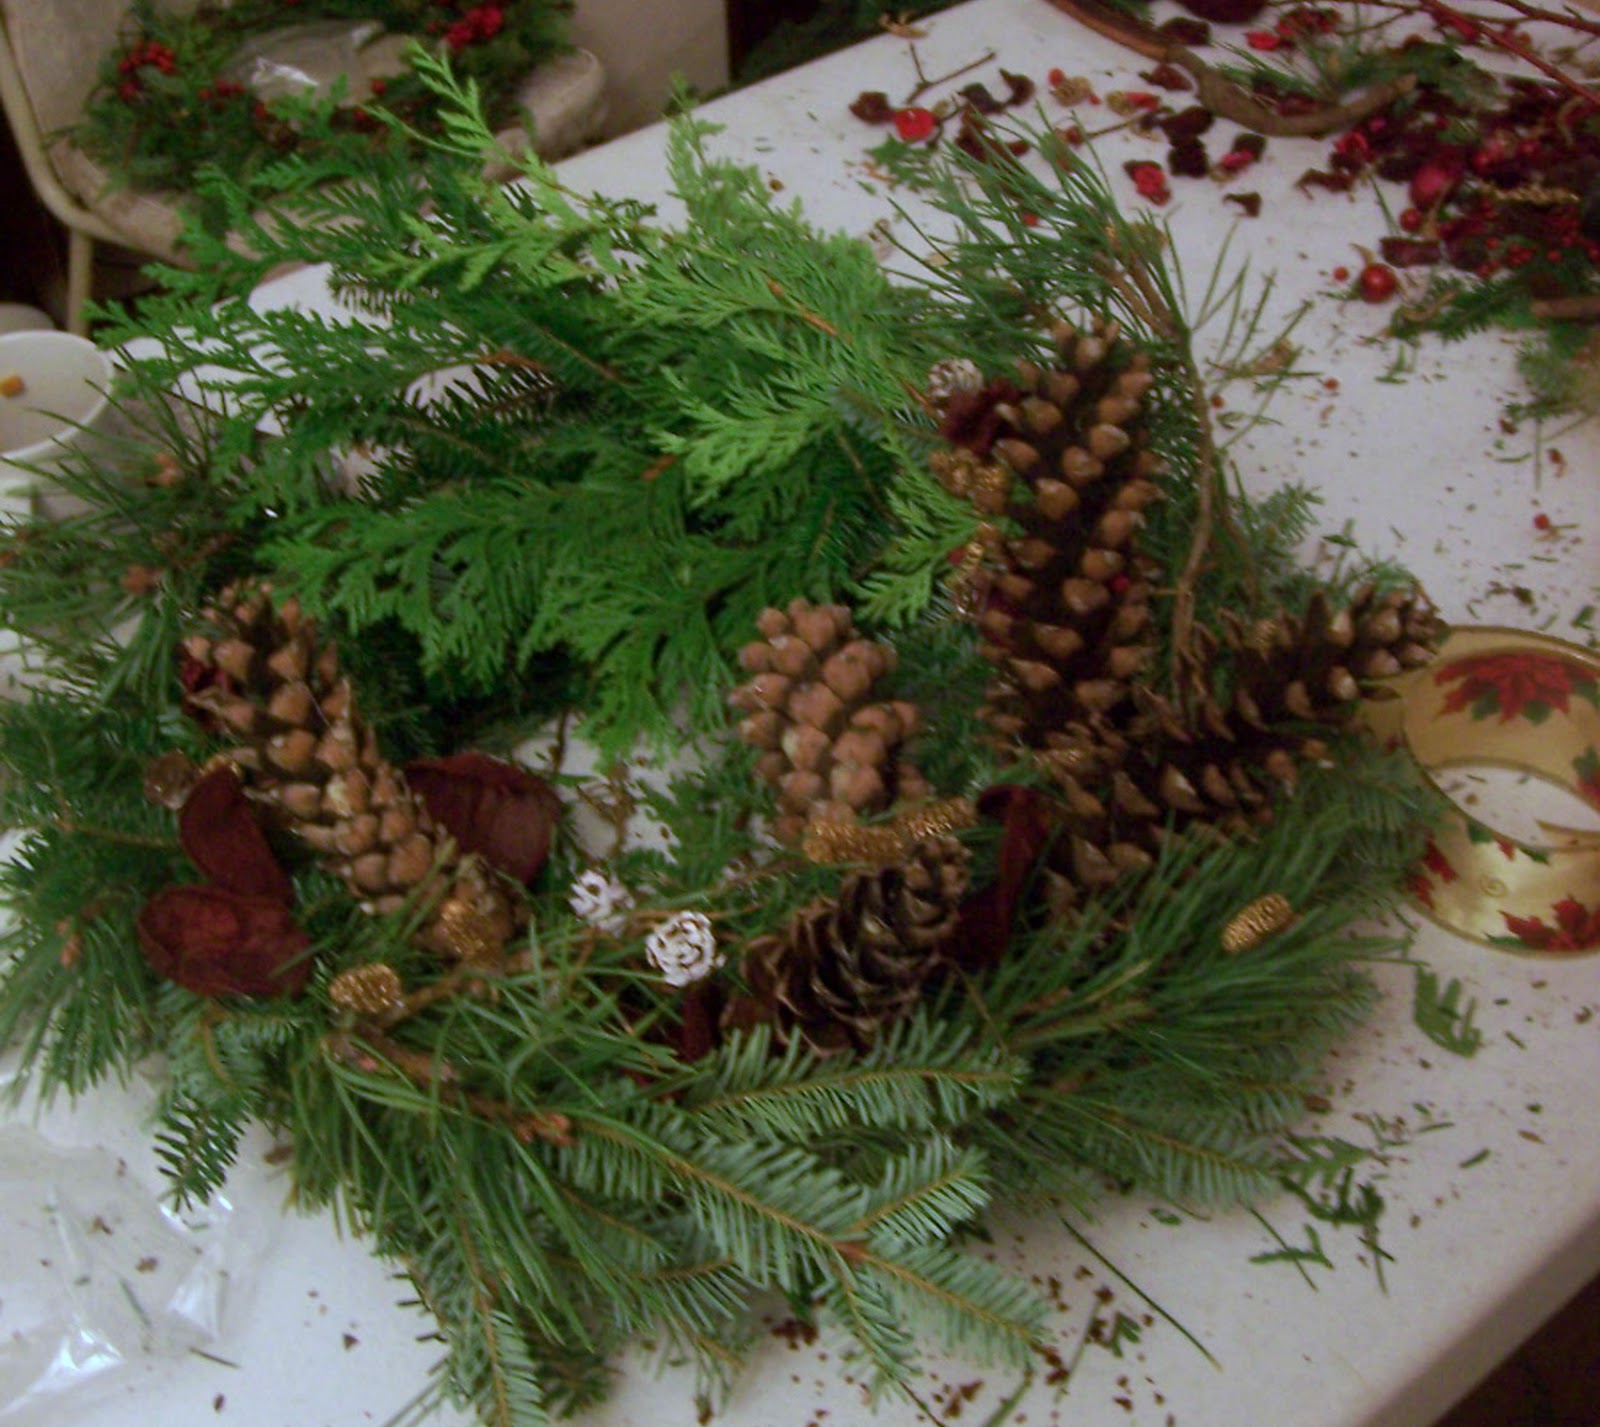


Edit: Last night I forgot to take pictures of my own wreath, but it was just as well. My mother in law gave me a beautiful string of lights for the wreath, so I was able to take some pictures with them on!

Thursday, November 25, 2010
Preparing for the Holidays Part 3: The Magic of Wizards and Truffles
A tradition Chris started the very first Christmas we celebrated in Penetanguishene together was to make truffles. Not the find-with-a-pig-similar-to-a-root-mushroom kind, but the ones make with chocolate. The ones that boast deliciously thin and hard shells and melt-in-your-mouth soft centres. And last weekend, he started the hundreds that will eventually find themselves to the hands (and stomachs!) of our family, friends, and neighbours.
This year he is making truffles with the following centres:
Bailey's
Rum
Mint (non-alcoholic)
Mint (alcoholic)
Cherry (non-alcoholic)
Cherry (alcoholic)
Raspberry-White chocolate (made with our own home-made raspberry jam!)
Caramel
I don't know how he does it, but every year he makes hundreds of the little chocolates all without recipes. And each year, the centres become creamier and creamier; and the variations of chocolate and filling become more elaborate.
I was also busy in the kitchen, making the first batches of cookies that will accompany each box of truffles. Last weekend was the first batch of gingerbread (I'll have to do at least one more before the holidays), and from it, I made a large gingerbread house for Lucien, several gingerbread men and women, and quite a few mini ones. Last time I was at our bulk food store I purchased a pair of tiny cookie cutters, about 2 inches high, that make the cutest gingerbread "hobbits."
And speaking of hobbits, I've finished the first part of Lucien's knitted gift; Gandalf the Grey from the Lord of the Rings:

I am working on Aragorn now, and then I have the four hobbits to complete (Should "hobbit" be capitalized? We don't capitalize "human," but it still does not look right. And yes, this is where my mind wanders....), Frodo, Sam, Merry, and Pippin. I also finished the hat for my brother-in-law, so that's two gifts done. Yay!
So on that note, less typing, and more knitting!
Monday, November 22, 2010
Sunday Bake of the Week: Gingerbread
Holiday cookie baking in our home is a funny thing; shortbread and gingerbread, the two cookies that are most representative to me of the holiday season, also happen to be the two cookies Chris detests the most.
And then there's Lucien. Given the choice between a chocolate chip cookie or a gingerbread one, he almost always goes for the gingerbread. So when planning the cookies that I will be baking each year, I have to make sure that there are enough that Chris will enjoy to combat the gingery goodness.
But for all of us gingerbread lovers, here's a recipe that's sure to make your yummiest gingerbread people (and trees!) ever;

As well as the perfect base for all that candy!

Gingerbread
3/4 cup ( 175 mL) unsalted butter, melted
1 egg, lightly beaten
1/2 cup ( 125 mL) molasses
3 cups ( 750 mL ) all-purpose flour
1 tbsp ( 15 mL) ground ginger
2 tsp ( 10 mL) cinnamon
1/2 tsp ( 2 mL) each of allspice, salt and baking soda
1. In a bowl, using a wooden spoon or electric mixer, beat butter with brown sugar until blended, at least 2 minutes. Beat in egg. Stir in molasses. In a large mixing bowl, using a fork, stir 2 cups (500 mL) flour with ginger, cinnamon, allspice, salt and baking soda until evenly blended. Make a well in centre, then pour in molasses mixture. Stir until all flour is absorbed. Stir in remaining flour, 1/4 cup (50 mL) at a time, until dough is no longer sticky but still soft. Divide dough into 4 portions. Form into balls. Wrap or place in resealable plastic bags. Flatten dough slightly and seal. Refrigerate until cold, at least 30 minutes or up to 1 week, or freeze.
2. When ready to bake, preheat oven to 350F (180C). Lightly grease baking sheets with shortening or vegetable oil, or coat with cooking spray. Roll out 1 ball of dough until 1/4 inch (0.5 cm) for thick cookies or 1/8 inch (0.3 cm) for thinner cookies. Cut into shapes using cookie cutters. Place on baking sheets.
3. Bake in centre of 350F (180C) oven until deep brown around edges and firm to the touch, about 10 minutes for thick cookies or 7 minutes for thinner cookies that are about 2 inches (5 cm) wide. Larger cut-outs require more baking time. Repeat with remaining dough.
4. Remove baked cookies to racks to cool. Cool sheets slightly before adding more cookies to be baked. Store cooled cookies in an airtight container in a cool dry place. They will keep well for at least 1 month.
Thursday, November 18, 2010
It's the Middle of November, and you're still harvesting what?!? (Garden Update)
So at the end of the summer, Chris got this brilliant idea. Why not build frames over the vegetable beds and arbours, cover them with sheet plastic, and see what happens!
At best we thought it would keep frost and snow from accumulating on the beds, allowing us to plant even earlier in the spring. We had a thought that we'd be able to leave some veggies in the "green houses" for a few weeks or so, and it would just be like they were in a refridgerator. But so far, the experiment has exceeded all expectations.
Not only has the covers protected the vegetables from frost, but the air inside is at least 2-4 degrees warmer than the outside! The soil is also retaining moisture; we can see that each afternoon when the inside walls are covered with condensation and dew.
As for the vegetables, they are flourishing! Not only has the covers protected them from frost, but instead of just keeping the plants dormant as they would in a refrisgerator, they are actually still growing! Three weeks ago I harvested the last of the carrots, but we still have beets, scallions, romaine lettuce, and our swiss chard in the first two beds.
As this is an experiment, the last bed we decided to leave uncovered (as there were no vegetables left in that bed) to act as our control bed. That way in the spring, we can see if covering the beds really makes a difference in how early we can plant next year's crop.
That being said, even if there is no difference in how early we can plant next year, I am sure we'll still use the covers again next fall. The fact alone that it is the 18th of November, and we have vegetables still growing is enough of a reason to do it again. In fact, we plan to plant specific "Winter" crops late Summer/early Autumn, such as kale, beets, lettuce, and scallions to see how long we can keep them in the beds. I am thinking we could even plant some cooking onions in the fall, and have them ready even earlier in the summer, perhaps getting two crops next season instead of one!
We had to change the design of the covers slightly once they were up for a couple weeks. The first design consisted of wooden 1 inch strapping forming a triangular prism over the beds and arbours, over which we stapled the sheeting, and reinforced with duct tape. But after a couple rain and a good wind storm, the pieces of sheeting began to seperate and pull away from the frames. So Chris purchased more strapping, and sandwiched the plastic between two lengths of lumber. So far that seems to be holding quite well (we also switch to contractor-grade outdoor duct tape!), and we'll just have to see what shape they're in in the Spring.
The frames may not be the prettiest, but if they mean our growing season is extended, and the amount of food produced increases, than it's worth it!
Tuesday, November 16, 2010
Mother Nature Doll pattern up and running!
I finally finished edited the pattern for the Mother Nature doll I created back in September, and am now working editing the patterns for her clothes!
I am very happy with the results and I think I've worked out all the kinks; but of course, if anyone would like to have a go at it and let me know if there are any issues, or what they thought of the pattern, that would be wonderful!
Also, if anyone does make her up, I would love to see pictures! It would be wonderful to see what Mother Nature looks like to others!
To see the pattern, click here, or check out the link at the right!
Sunday, November 14, 2010
Sunday Bake of the Week: Apple-filled Scones
Every Friday I go to our local cafe to knit, chat, and enjoy the delicious coffees and baked goods. One such goodie is a scone they make that has a strawberry-rhubarb filling. It is divine.
But being advernterous, I thought it couldn't be too difficult to mimic, and gave it a try!
Due to lack of either strawberries or rhubarb, I had to go with what I had, which was apples. Lots, and lots of apples. Yet the scones turned out brilliant, and you could easily substitute other fruits for the filling. As I try other combinations, I post the variations used.

Fruit-Filled Scones
Preheat oven to 425 F
Filling:
2 medium sized cooking apples; peeled, cored, and diced
1 tbsp plus 1 tsp flour
1/8 tsp salt
1/2 tsp cinnamon
1/4 tsp nutmeg
2 tbsp brown sugar
(1/4 cup raisins)
Combine the apples with the dry ingredients in a saucepan, and mix until the apples are thoroughly coated.
Add:
2/3 cup water
1 tsp lemon juice
Put over low heat and stirring frequently, bring just to a boil. Turn off the heat, cover, and let sit while you prepare the dough.
Dough:
2 cups all purpose flour
1 1/2 cups whole wheat flour
1 tsp salt
8-12 tbsp of butter, shortening, or a combination of both
Using your fingers, two knives, or a pastry cutter, mix together until it resembles course meal. Make a well in the centre, and add:
1 1/4 cup milk
Quickly blend the milk into the dry ingredients, adding more if the dough is too stiff. Transfer dough to a lightly floured surface, and knead for about 2 minutes. At this time, I divide the dough in half to make it easier to work with.
Taking one half of the dough, roll it out into a square about 1/4 - 1/2 inch thick. Take half of the apple filling, and spread it out over the rolled dough, carefully leaving about 2 inches without filling at one end (that will be the outside of the roll). Starting at the opposite end, start rolling the dough into a pinwheel; trapping the filling on the inside. When you get to the end, place a few drops of water along the edge to seal it.
Cut the roll into 12 pieces, and repeat for the second half of the dough.
Now transfer each piece, with the pinwheel visible from the top, to a greased muffin tin. Each piece should sit inside one muffin cup to bake.
Bake for about 20-25 minutes, until the tops are nice and golden, and the apple filling has become caramel in colour.
Let rest for 5 minutes in the pan before transferring to cooling racks. These are best served fresh and still warm, but can be reheated for 20 seconds in the microwave as well.
Makes 24 scones.
Saturday, November 13, 2010
Make Ready the Holidays; Our knit group
Back in October, when I started looking at all the gifts I wanted to make this year (and feeling overwhelmed!), I decided that the only way I was going to get any of it done was if I planned specific time each week where I could escape from the boys; the chores; the chaos of the house.
And that is when I realised that I was probably not alone in that thinking. And thus, our weekly fibre arts group was born.

We meet at our local coffee pub, The Froth Cafe, enjoy delicious hot drinks and goodies;


And gossiping; enjoying the company of other like-minds, and relishing in the fact that we are slowly completing the gifts on our lists.
We have a variety of ages, women from various stages in life: students, mothers, grandmothers; yet we all have a common interest in creating works of art with just needles and yarn. It's a chance to relax, recharge, and to just enjoy being in a great environment with great food.
At this point, Chris needs a special mention. Each Friday night he keeps the boys safe at home for three hours, instead of going out with the guys, as I get to escape to my fibre sanctuary. Thanks hun, and remember, Christmas is almost here!
And that is when I realised that I was probably not alone in that thinking. And thus, our weekly fibre arts group was born.

The wonderful flyer I made, but never printed out and distributed. Despite that, we've still had a great turnout each week!
We meet at our local coffee pub, The Froth Cafe, enjoy delicious hot drinks and goodies;

And just sit, knitting;

Crocheting;

And gossiping; enjoying the company of other like-minds, and relishing in the fact that we are slowly completing the gifts on our lists.
We have a variety of ages, women from various stages in life: students, mothers, grandmothers; yet we all have a common interest in creating works of art with just needles and yarn. It's a chance to relax, recharge, and to just enjoy being in a great environment with great food.
At this point, Chris needs a special mention. Each Friday night he keeps the boys safe at home for three hours, instead of going out with the guys, as I get to escape to my fibre sanctuary. Thanks hun, and remember, Christmas is almost here!
Friday, November 12, 2010
Preparing for the Holidays Part 2: Organization Cont., and the Handmade Holiday Challenge
So remember that wonderful list I made in the first post in the series, where I outlined all the gifts I'd like to either knit or sew? Well, it's changed. Quite a bit.
I knew this would happen; that I'd take a second look at the list, and realize that yet again, I was being a little too ambitious. So I whittled it down. But then I took those items that I was planning on making, and made some of them a little larger, or more elaborate. So really, I'm not sure I did myself much of a favor. Here's the final version. (Final that is, until I decide that I am still being a little overzealous, and trim the list down further still!)
But the good news is, I finished the first item on my list, a pair of anklet socks I made in Patons Misty!

Holiday Knitted Gift List, v10.0:
Anklet Socks (Done. Hurray!)
Fellowship of the Ring Dolls (which includes Gandalf, Aragorn, Frodo, Sam, Merry, and Pippin!)
Winter Gnome Doll
Purse (partially made from a recycled fair isle sweater)
Cabled Hat
Neck warmer (also made from the fair isle sweater)
(...if I have the time, I'm including another man's hat, some coffee cup holders, and finishing the blanket I started for Marcus when I was still pregnant with him!)
In addition to the things I am knitting, gifts we will be making also include homemade BBQ sets (sauces and meat rubs), apple butter, cookies, truffles, hot chocolate mixes, and breads. The next two months are going to be busy!
Also, we have joined the Handmade Holiday 2010 challenge, and we encourage you to do the same! For more information, and to see all the blog posts associated with it, click here!
I knew this would happen; that I'd take a second look at the list, and realize that yet again, I was being a little too ambitious. So I whittled it down. But then I took those items that I was planning on making, and made some of them a little larger, or more elaborate. So really, I'm not sure I did myself much of a favor. Here's the final version. (Final that is, until I decide that I am still being a little overzealous, and trim the list down further still!)
But the good news is, I finished the first item on my list, a pair of anklet socks I made in Patons Misty!

Holiday Knitted Gift List, v10.0:
Fellowship of the Ring Dolls (which includes Gandalf, Aragorn, Frodo, Sam, Merry, and Pippin!)
Winter Gnome Doll
Purse (partially made from a recycled fair isle sweater)
Cabled Hat
Neck warmer (also made from the fair isle sweater)
(...if I have the time, I'm including another man's hat, some coffee cup holders, and finishing the blanket I started for Marcus when I was still pregnant with him!)
In addition to the things I am knitting, gifts we will be making also include homemade BBQ sets (sauces and meat rubs), apple butter, cookies, truffles, hot chocolate mixes, and breads. The next two months are going to be busy!
Also, we have joined the Handmade Holiday 2010 challenge, and we encourage you to do the same! For more information, and to see all the blog posts associated with it, click here!
Wednesday, November 10, 2010
One man's trash....
Waste not, want not!
I remember first hearing/reading that phrase as a child, when I was reading the Little House on the Prairie series of books, and obsessed with all things "homesteady/pioneer." At the time, I didn't quite understand the meaning, yet the phrase always stuck with me.
Now, as an adult, I know the meaning of that phrase all too well. And luckily, so do our friends and family! We are forever receiving bags and boxes of clothes, cups, pots, and other household items. In fact, except to purchase a specific item for say, the holidays, I think I've gone shopping for the little one's clothes a grand total of perhaps two or three times. It's wonderful.
The same thing happened when we first moved into our house. It seemed like everyday for weeks (it still happens!) someone or another was showing up with a kettle they didn't need, or some pots, or a food processor: more kitchen gadgets than you can shake a stick at! Not only did this save us so much money, but it probably prevented a good portion of those items from just ending up in the garbage. This happened so much that now when I'm given a box of household items (or clothes!) I can afford to be choosy, and decide which one of a given item I want to keep, and which one I'll be giving away. I love freecycling!
And yet even in your own possessions, you can still find unexpected treasures. About four years ago, Chris received some sweaters from my mom that she had accumulated over the years. Most he like and wears, but there was one, a fair isle knitted sweater, that he didn't care for. At the time, though I thought it was beautiful, I couldn't see a use for it, so I just packed in up in the thought that one day we'd find a new home for it.

However, now that I am more versed in knitted and fibre arts, I can truly appreciate what a work of art it is (and it's 100% wool to boot!), and instead of just giving it away as is (plus it has a few little holes starting in it), I have decided to try my hand at steeking; and use it to make a purse, neck warmer, and whatever other small gifts I can get out of it (perhaps some coffee cup holders!). I love the idea that something so beautiful and yet previously unloved will get a breathe of new life as someone else's beloved object. I can't wait to start!
Wednesday, November 3, 2010
Canadian produce; an endagered species?
I saw this post on YouTube the other day, and it started me thinking again. Firstly, I was equally surprised and impressed that a company like Hellman's would make such a video. Obviously their doing it for their own advantage first, but it's great to see awareness of this making larger headlines than a few of us bloggers can do.
It also made me think of our own gardens, and the experiences we had over the summer when it came to purchasing our food from a grocery store. For a while, when we were reaping such a bounty from our own gardens, I wouldn't buy anything else that wasn't grown in Ontario. It wasn't too difficult, but then again the only produce I was buying was our fruit, so mostly that meant apples. But even our favourite variety, Gala, we weren't able to buy, as it was always imported from China or South America. I also noticed that we ate vegetables in rotation. Instead of how we normally enjoyed a variety of vegetables every week, we'd go a few weeks only eating fresh cucumber. Then when the zucchini was ripe, we'd eat cucumbers and zucchini, then when the cucumbers ran out we'd eat zucchini and green beans etc. Which is how humans would traditionally eat I imagine; always in season.
But now that the growing season in Canada is done, trying to buy local is made that much more difficult. There are still some apples, carrots, and other root vegetables available, but the picking is slim, at least in our area. And the smaller shops that do carry local produce have to charge way more to support the local farmers, that it's hard to afford the decision to go local. How can I afford to buy 6 potatoes (a small container) for $3 when I can buy 5 lbs for 99 cents? Even the meat is much more expensive. At our Foodland, I can buy a medium sized package of lean ground beef for about $4. I can buy ground beef from a local farmer, the same amount, for $6-8.
I wish we had the income to support only buying local. Our area has such diversity when it comes to meat especially; there's the usual chicken, beef, and pork; but also lamb, goat, elk, and deer. But the issue, at least for our family, is the cost. And I fear because most families are in our situation, that to keep afloat local farmers will have to charge more to compensate for less being sold, and therefor less and less families will be able to afford to buy food from them.
Something is wrong, when it costs me more to buy food that literally comes from 2 kilometres away, than it does to purchase food that comes from another county! I understand that it betters trade relations, but our government needs to step in and support our local food producers at a National level. Or before we know it, Canadian produce will become an endangered species.
Monday, November 1, 2010
All Hallow's Eve and Crazy-Costuming-Goodness!
Hallowe'en has got to be one of my favourite holidays. And not just because it's an excuse to dress up, or that it falls on the same night as Samhain; but because of the effect it has on children. I can see in my own son the same excitement I felt as a child when he got to put on his costume, hurried on by the fact that there are already trick-or-treaters at our door (though to try and get him to eat his dinner on Hallowe'en night is another matter entirely!).
And then, the curiosity and fear as we walked up to each house, unsure of what spooks or tricks my await us near the doors. His favourite quote of the night was "Mommy, it's not scary!" whenever we came to a house with minimal decorations. It's amazing that we forget how scary a simple skeleton or cobweb can be to a child.

Of course, the night started out with carving and lighting the pumpkins; both to ward of the spirits that might wander our way, and to let the neighbourhood children know they'll find goodies inside (a pirate for Lucien, a one-tooth-wonder for Marcus).

Then it was time for the short trek up and down our street to collect our treasures (though in fact this picture was taken after we just got home, hence the little red noses!)
And that brings me to the topic of the costumes. Marcus wore the little dragon outfit that Lucien wore for his first Hallowe'en (though it barely fit - we couldn't get the hood over Marcus' head!), but I think both Chris and I went a little crazy when it came to Lucien's costume.
At first he wanted to be Strider (also known as Aragorn, from the Lord of the Rings). But after I started working on the leather armour, he decided he wanted to be Rohan, or one of the Rohirrim. So I had the adjust the design and colour scheme slightly, but in the end, it turned out fantastic!
First, I made him a tunic out of recycled green linen from an old sun dress I was given. It is all stitched by hand (though I was lucky enough to use some of the pre-existing seams and edges which cut down on sewing time!), and the front is closed with ribbon buttons.


All in all I would say the night was a success, even though it was over too soon. At least now I can get back to working on Christmas and Yule gifts!
And then, the curiosity and fear as we walked up to each house, unsure of what spooks or tricks my await us near the doors. His favourite quote of the night was "Mommy, it's not scary!" whenever we came to a house with minimal decorations. It's amazing that we forget how scary a simple skeleton or cobweb can be to a child.

Of course, the night started out with carving and lighting the pumpkins; both to ward of the spirits that might wander our way, and to let the neighbourhood children know they'll find goodies inside (a pirate for Lucien, a one-tooth-wonder for Marcus).

Then it was time for the short trek up and down our street to collect our treasures (though in fact this picture was taken after we just got home, hence the little red noses!)
And that brings me to the topic of the costumes. Marcus wore the little dragon outfit that Lucien wore for his first Hallowe'en (though it barely fit - we couldn't get the hood over Marcus' head!), but I think both Chris and I went a little crazy when it came to Lucien's costume.
At first he wanted to be Strider (also known as Aragorn, from the Lord of the Rings). But after I started working on the leather armour, he decided he wanted to be Rohan, or one of the Rohirrim. So I had the adjust the design and colour scheme slightly, but in the end, it turned out fantastic!
First, I made him a tunic out of recycled green linen from an old sun dress I was given. It is all stitched by hand (though I was lucky enough to use some of the pre-existing seams and edges which cut down on sewing time!), and the front is closed with ribbon buttons.

The undercoat was made from wool broadcloth, which I then went over and painted on gold detailing. I chose just simple Celtic and Norse knot work designs that I though would mimic the actual garments worn in the movies.

The armour was my first real foray into working with leather. I originally bought this buckskin to make Lucien moccasins when he was a baby, but after a first attempt that I was unhappy with, I hadn't touched it since. I painted the rough side with watered-down acrylic, and then used sandpaper to give it a worn look. The designed were painted with the same gold as the wool, and I took inspiration from the gilding on Theoden King's own armour and the outfit worn by the hobbit Merry when he was a squire of Rohan, and then created my own images.
All the stitches had to be made in the leather with a hammer and awl first; hard work, but actually a lot of fun!


Chris also went overboard with the construction of the sword but I am so glad he did; it is amazing! Lucien loves it so much that by the time Hallowe'en came, he had already beat up the blade, and it had to be repaired several times. But it was well worth it. It was made with pine strapping that Chris whittled and sanded by hand, and the blade and handle (one piece) was fitted through the hand guard, and glued in place. The handle is wrapped in metal wire, and the blade and hand guard is covered in polished metal foil. It was the perfect accessory to his ensemble.

The cloak was also made from the wool broadcloth, and was attached directly to the chest plate with metal buttons. The detailing on the collar was a nightmare however, and for some reason I kept over-thinking the knot work, which caused it to take twice as long to finish as it should have.


And there is our lad, kitted out and ready to slay any Nazgul that may approach!

Saturday, October 30, 2010
Our Thanksgiving - And a better-late-than-never Bake of the Week!

As you can tell, this is just one of the three posts I started, then never finished. This one was dedicated to the wonderful Thanksgiving we shared, and was also going to feature a new creation of ours; zucchini-apple pie. (I can only take partial credit for the pie; though I baked it, the whole idea was Chris'. I think I looked at him like he had two heads when he suggested using zucchini in an apple pie, but as always, he was right. It was delicious!)
Our Thanksgiving was amazing. Everything; from the food, to the conversation, to the warmth and love of being surrounded by our family and friend (you know who you are; and I use the term "friend" loosely; we consider you more family than friend!). Our house was packed; and at final count, ourselves included, there were 19 people present. It was a blast! I kept looking at the food, and beautiful new dishes (we didn't have nearly enough place settings and so I had to purchase more - and was very fortunate to find plates and bowls at $1 a piece, and the flatware was also on sale!), and couldn't believe how lucky we are. That with so many people going hungry in the world, with so much hurt and devastation, we were able to feed that many people a great meal, and not break the bank. Mind you, all the vegetables came from the garden (we had 6 different side dishes), and the desert and dinner rolls were home-made, but still. We are blessed.
And even though our kitchen was packed, it was not uncomfortably so. It kept the house warm, and our rooms were never without the sound of laughter. And then the next day, we went over to Chris' parents for another dinner - what a wonderful weekend! (My stomach is still recovering!)
But back to the pie...
I took the basic apple pie recipe I use, and just substitute peeled and cored zucchini slices for some of the apples. The ratio depends entirely on your own preference, and does nothing to the way it is cooked. In fact, I would go as far as to say it does nothing to the taste, either. It is preferable to use zucchinis that grew large (at least 1 1/2 feet in length) as the texture is then more like apples, but as far as taste goes, the zucchini just absorbs the spices, sugar, lemon, and apple flavour. None of our guest knew what was really in the pie until we told them (after it was consumed, mind you!), and even then, some didn't believe us!
Apple-Zucchini Pie
Take 6-8 cups of a combination of:
apples, peeled, cored, and sliced 1/4 inch thick and
zucchini, peeled, cored and sliced thinly
Mix fruit together in a large bowl with:
3/4 cups sugar
2-3 tbsp flour
2 tbsp lemon juice
1/2 tsp cinnamon
1/8 tsp salt
Let the mixture stand at room temperature for 15 minutes, or use the time to prepare your favourite dough recipe. You'll need enough to make a bottom and top crust for at least a 9 inch pie pan. Once you've filled the pan with the bottom crust, pour in the fruit mixture, and dot the top with 2 tbsp of butter. Cover with the top crust (don't forget to put vents in the top), place a baking sheet undernieth to catch any overflow, and bake at 425 F for half an hour. Then reduce the temperature to 350 F and bake for another 30-45 minutes, until the crust is golden and juices come bubbling out.
I like to serve the pie warm with vanilla ice cream, but it is still good at room temperature (and actually cuts better when it's cooler).
So yummy!
Friday, October 29, 2010
The curse of the 50th post
I have to apologise for the break in writing this month. I am not sure why I stopped, sure, with Hallowe'en costumes and Christmas presents being made we've been a little extra busy, but not so much as to keep from making even a couple of short posts.
I started writing three different topics, but just wasn't able to finish any of them! The first was a celebration for the 50th post; and then it just went downhill from there. But we did it! Here is the 50th post on the blog!
Perhaps to some it is not considered a huge achievement, but to me, it is the start of a long and wonderful journey towards sharing our family's experiences with the world. It may be of some interest to know that one of my main reasons for starting the blog is that I want to one day write a book chronicling our progress towards a more sustainable lifestyle. And by writing a blog, I can not only share our journey now, but go back at a later date and use these posts as the basis for that book.
Sure we've started small; just with friends and family following us here or on Facebook, but every time I see that someone new (and previously unknown to us) has liked our page or has chosen to follow the blog, I get so excited! Though I know that to keep people reading and interested, I have to maintain my posting!
So without any further interruptions, I am going to go finish the other posts I had started (including continuing the Bake of the Week again!), and I'll be back with some more interesting news soon!
Monday, October 11, 2010
True Wealth
I once heard Chris remark that the only true material wealth is land. Not your house, or business, or the buildings on it. But the soil, the earth; the land itself.
For currencies can fail; stocks become worthless; even all the jewels and gold in the world are only worth as much as someone is willing to pay for them. But with enough land to feed and house you, you and your descendants will never be poor.
This idea was a driving force for us when we purchase our home, and we were lucky enough to not only find a house that was everything we could need and more, but one that came with a property large enough for us to begin farming it and make the land work for us. Yet lately that has had an even greater meaning for me.
Unfortunately, the health (both mental and physical) of my grandmother is failing. It is hard enough to watch as she becomes like a little child again; confused and angry when her body and mind let her down, or to hear of the effect this is having on my grandfather; who used her as such a point of strength and support. But now I learn that "The Farm" she owned will be up for sale, and most likely sooner than later.
I use the word farm loosely; though in the days my great-grandfather owned it it was a working cattle farm, right now it is 49 acres of pristine meadows, forest, and lake.
I remember as a child, going up for days at a time and just running free. Playing in the grasses, walking through the woods, having refreshing snacks under the great maple trees that shaded the patio. We were super-heroes there; pioneers; even Sailor Moon! And to hear my mother talk, she has similar memories, of visiting her own grandparents and playing in the fields, being as carefree as a child can be in such nature.
And now, as I think about The Farm leaving the family, I am filled with such a sense of mourning. Not just that it has been with the family now for two generations, but the fact now that even if anyone wanted to, there is no way any of our family could ever afford to purchase that kind and amount of land ever again. It must be worth a fortune.
But I honestly don't care about that. I am saddened that such a gift will be leaving the family. To me, something like that is to be cherished, passed from one generation to the next. I do not care who in our family owns it, as long as someone does.
I do not blame my grandparents; they must do what they feel is right, and I suppose it really is none of my business. What angers me is that it seems like no one realizes what a loss this will be. Everyone is so focused on the here and now, that they give no mind to what my generation's children, or their children's children could be doing with such land. As one of my relatives mentioned, "we've all enjoyed the farm over the years, and it's fair to say that that era is coming to an end." It is spoken as if it was just a place to have fun (which it was), but it boggles my mind that no one realizes the value of The Farm, and not just the monetary value of it.
I just wish I could do more. I know emotionally I can be there for them, offer my support, and I will always be there, no matter what happens. But I just wish I could do more.
I wish I had the funds to buy The Farm outright. It would be in the family, they could spend as much time as they wanted there (or any family members for that matter), but not have to worry about it being a money pit, or about having to keep paying the taxes etc. on a place they just can't live at (the winters can be hard there, the driveway alone is a chore to navigate once the snow arrives).
I wish a bunch of us in the family could go in together and buy it. There is so much that could be done! The Farm could be rented to a family to actually farm it. We could turn it into a CSA; have it available to the Scouts to use as a camp ground (which they used to, I remember as a child walking through the forest and seeing the tree forts they had built); or use it as a venue for re-enactors. It could be lent to a university or school to experiment with various environmentally-responsible gardening techniques.
Now part of me did know this day would eventually come. But I still feel so helpless. I know it's not my place, but I just wish I could do something! Once The Farm is gone, not in any of our lifetimes would we be able to acquire such a thing again. It's sad.
A few months ago, before my grandmother began to get so ill the boys and I went to visit her, and took some great photos. I am afraid they will be all I'll have left to remember such a place, and only hope I can get back again to see it at least one more time. It really is amazing.


Saturday, October 9, 2010
Garden Summary 2010: Part 2
As I look into our outside, I am reminded that Autumn has arrived in full regalia. Our backyard is a sea of vibrant orange-red; the maple leaves creating a stunning contrast to the bright green of the grass.
Each morning I expect to see frost now when I let the pups out, and our house has even hit 19 degrees C a couple times. At least we have made it to October this year before we had to use the furnace! (Last year it was September 27 and we had a cold snap, we were so dissappointed!)
One of the things I had meant to discuss in the first garden summary was our soil; I was supposed to include it under the heading of the garden beds. Alas, my mind betrayed me, and I forgot. So that will be the first thing I talk about!
---------------------------------------------------------------------------
Soil composition
The soil in the side yard where the majority of our gardens ended up was originally sand, with a lot of clay. Certainly not ideal for growing vegetables, but like I mentioned before, one of the beauties of raised beds is that you can compensate for poor soil by filling in the beds with any that you like. Because of it being the best of all worlds, we chose to fill ours with triple mix: the peat moss meant that the soil would not compact as much, and the high organic content would provide more nutrients right off the bat to our veggies.
The nutrient content was very important to us, particularly as we are not using any commercial or artificial fertalizers. We started the composters early this year, so hopefully by next spring we'll be able to empty the first, and use it to renew the beds for the next season!
I would like to talk more about the composters, but my knowlege in that area is far surpassed by Chris'. I've just asked him if he'll write a post on them, and he's agreed, so stay tuned!
Now, on to the fruits and veggies!
Green Beans
Originally, I started the green beans, zucchini, squash, and cucumbers in trays, with the idea that once they'd sprouted, I would transfer them to the beds. I thought this would give me a head start on the growing season (not that we needed it this year, it was early enough as it was!), but ended up having to replant most of them in the beds anyways. Of the 16 or so seeds I planted in pots, only about 7 came up. I had issues getting the right amount of moisture in the little containers: either they were too wet, or too dry, and in the end I think I killed off many of the seeds that would have grown. It was much easier to maintain consistant moisture in the beds, so the next time I am not going to start any of the beans in trays but plant them directly in the garden.
At first we thought we were not going to get many beans from our plants. We ended up with 14 plants at maturity (in a bed 4 feet wide, we planted two rows of 7, with about 6 inches between the two rows), and got perhaps a dozen or so beans from each plant by about the middle of August. We couldn't really see any new flowers, but then around the end of August Chris looked at the tangle of vines (That's another thing we'll change; instead of having them grow up a ladder of twine, we're going to have them grow up poles, about three plants a pole. This was something we saw at a local historical site; they had the beans growing up straight branches that still had the bark on.) he saw several beans that were about 6 inches long, and many more smaller ones hiding. Once all those were picked, we still kept getting new flowers!
So next year we're going to plant twice as many beans, plant them closer together, but then train them to grow up poles.
Zucchini
Our zucchini grew amazingly well this year. I am not sure how many fruits we got, but I now it was much more than we had expected. We platnted two hills, 3 feet apart, and each hill had 4 plants. By the time the we had to cut down the plants, they had completely filled their section of the bed, went into the beans, and even into the walkways!
Most of the zucchini we picked at medium size, around 3-5 lbs, but about 6 or 7 we let grow until they were at least 1 1/2 feet. These had more of the consistancy of squash, and the seeds and skin were no longer edible. So I peeled and cored them, shredded half and sliced the other, and put them in the freezer. Because I put them in small bags, it's easy to grab just the amount I need and in fact, I am using some of the slices to make apple-zucchini pies. If they turn out, I'll post them as the Bake of the Week.
Next year, we're going to plant even more zucchini. They freeze so well, and there are so many things you can do with them, they're just an all-around useful fruit. We're going to move them next year though to around the back deck (which has high wood trellises all around), and train the tendrils to grow vertically. Hopefully they'll take, and if so, will be much easier to harvest than trying to navigate the webs of prickly vines!
This is long enough, so for part 3 I'll talk about our acorn squash, cucumbers, and swiss chard!
Friday, October 8, 2010
Giving Thanks
As this weekend is the Canadian Thanksgiving, I thought it would be appropriate to write a post of thanks myself. This is only made more befitting as we have just about finished our harvest season, and with good food, good friends, and good family about to be celebrated by us this Saturday (we are hosting dinner this year; 20 people are expected, and I am cooking a turkey for the first time - yes, I am terrified!), I would like to share my thanks on the Web, as well.
I am thankful for my amazing, hardworking, talented, and all-around wonderful partner. Without him I would not be as happy, healthy, and prosperous as I am with him. I would probably not have gone back to school, or pursue a career worthy of my talents, nor had our beautiful children. Not to mention the love he showers on me each day; I am so lucky to have him in my life.
I am thankful to my sons; each beautiful and marvelous in their own ways. We have been blessed with two healthy, inquisitive, creative, and intelligent boys, who will keep us running and busy for many years. I am filled with such awe and love whenever I look at them, and find it hard to believe that such perfect, smiling little beings came from me.
I am thankful for our extended family, and our friends who are family if all but in blood. We are blessed to be surrounded by such supportive and giving people; both in my family and in Chris'. There is so much love in our family, it is beyond compare.
I am thankful for our home. It was a long time coming - many years of sacrifice and doubt, but the culmination of our hard work has paid off - we have found our "forever home." A place where our sons will grow into men, and finally leave the nest. A place where we will continue to leave our mark on it, and slowly over the years make it work for us. I will not say we are making it our own, because it has felt like that almost from the day we moved in. I still cannot believe some days how great a house this is, yet it has always felt like ours.
I am thankful for our furry children, too. Though they all (four of them!) may drive me to distraction; they also bring such joy to our home, and warm bellies for feet on a cold night. They are teaching us patients, consistency, and the meaning of unconditional love. We are blessed.
I am thankful for our harvest. Our gardens gave us a (albeit small) taste of what it is like for the farmers who grow our food: the frustrations, successes, and finally the sense of accomplishment that comes with growing your own produce. The fact that we are teaching our sons that food is not something that magically appears on your table or the super-market, but something that takes a lot of time and effort to grow, will hopefully give them an appreciation for what they consume. And how it is so important to do this in a sustainable, healthy, way.
I could probably go into a thousand more things that I am thankful for, but I will end with this: I am thankful that I live in Canada. We may gripe and grown over our government, our taxes, our health-care system. But we have it good. It is all too easy to get caught up with the doom-sayers, and only dwell on the dwindling fresh-water supply, vanishing forests, or polluted earth. So today I am going to be thankful for what we do have. A great and beautiful country, were freedom of speech is not only allowed but encouraged, where freedom of religion and point of view is allowed and all the consequences that follow. That I can walk my son to the library at night and not fear for my life. That we have brothers and sisters who are willing to leave the safety and comfort of their homes to try and bring peace and stability to the lives of others less fortunate all around the world. I am thankful for our beautiful trees, our fresh air, and our clean waters.
I am very lucky, and very blessed. A huge thank you to everyone who checks here regularly to follow our family. Thank you for your patients when real life got in the way of posting, and thank you for your kindness and support in reading the post that do get posted.
Though this weekend is Thanksgiving in Canada, wherever you are, please take the time to thank those in your life who are important to you. Take the time to reflect on just how lucky you are; that in the chaos and misery of the world, we all have our little piece of heaven.
Wednesday, October 6, 2010
Sunday Bake of the Week: Oatmeal Fruit Bars
This sunday I wanted to reinvent a recipe I've used many times.
For my birthday this year, my sister in law gave me the cookbook Deceptively Delicious by Jessica Seinfeld (yes, Jerry's wife!), a great book that introduces different ways to include various fruit and vegetable purees into everyday food. This recipe originally called for blueberry preserve and spinache puree, but ideally you could use whatever jams/preserves you have at home. Bear in mind though, if you're going to use a strong tasting vegetable like spinach, that you use a strong tasting fruit like blueberries to hide the taste.

For my birthday this year, my sister in law gave me the cookbook Deceptively Delicious by Jessica Seinfeld (yes, Jerry's wife!), a great book that introduces different ways to include various fruit and vegetable purees into everyday food. This recipe originally called for blueberry preserve and spinache puree, but ideally you could use whatever jams/preserves you have at home. Bear in mind though, if you're going to use a strong tasting vegetable like spinach, that you use a strong tasting fruit like blueberries to hide the taste.

Oatmeal Fruit Bars
2 cups quick oats
1 1/4 cups all-purpose flour
1/2 cup sugar
1/2 tsp cinnamon
1/4 tsp baking powder
1/4 tsp salt
1 tsp vanilla extract
3/4 cup butter
1 cup fruit jam/preserve (I used apple butter)
1/2 cup vegetable puree (I used apple sauce)
Preheat oven to 375 F and grease a medium sized baking pan.
In a large bowl, mix all the dry ingredients together. Add the butter and vanilla, and combine with the dry ingredients until the mixture resembles small peas. It is okay if some of the butter is showing. Put most of the mixture into the greased pan, setting aside a little less than 1/4 for later. Using your fingers, press the oatmeal mixture firmly into the pan.
Bake until the crust is just lightly browned at the edges, about 13-15 minutes.
While it is baking, mix together the fruit preserve with the vegetable puree. One the crust edges are browned, spread the fruit/veggie mixture evenly over the top, and sprinkle what is left of the oatmeal mixture over that.
Bake for another 20-25 minutes. Let the bars cool almost completely in the pan before cutting, and enjoy!
Try as many different variations as you can think of! I've also made it with strawberry jam and squash puree, and next time want to make it with raspberry and yams!
Monday, September 27, 2010
Sunday Bake of the Week: Pumpkin Spice Cookies
I spent the weekend with my family in Toronto, and at the last minute realised I had not prepared anything for the bake of the week! Wanting to make something that would begin the transition to more Autumn-like cooking, I looked for a recipe that called for pumpkin, and came across this recipe for cookies. I am going to experiment with substituting 1 cup of oats for one cup of flour next time, as I wasn't too crazy about the consistency of the first batch. I'll update this post once I've tried that.
Pumpkin Spice Cookies
1 Cup butter, softened
1 1/3 Cups firmly packed brown sugar
2 Large eggs
2 Teaspoons vanilla extract
2 Cups canned or fresh pumpkin puree
4 Cups all-purpose flour
2 Teaspoons baking powder
2 Teaspoons ground cinnamon
1 Teaspoon baking soda
1 Teaspoon salt
1 Teaspoon ground nutmeg
1/2 Teaspoon ground ginger
1/2 Teaspoon ground clove
Preheat oven to 350F.
In a VERY large bowl, cream together the butter and brown sugar. Add egg and vanilla, and once combined, mix in the pumpkin.
In a separate bowl, mix the remaining ingredients. Add the dry ingredients to the pumpkin, and mix thoroughly.
Grease cookie sheets, or line with parchment paper. Using a spoon, drop the batter onto the cookie sheets, about one tablespoon at a time. Or, if you want a neater-looking cookie, flour your hands and roll each tablespoon into a ball, and flatten the batter on the sheets with the palm of your hand.
Bake for about 15-18 minutes, until the batter is set, but the cookies have not yet turned brown. Let cool on racks, and enjoy!
Subscribe to:
Posts (Atom)